This tutorial assumes knowledge of:

  • Corona SDK
  • Tiled Map Editor

Here’s a short video of the game:

Corona isometric puzzle game

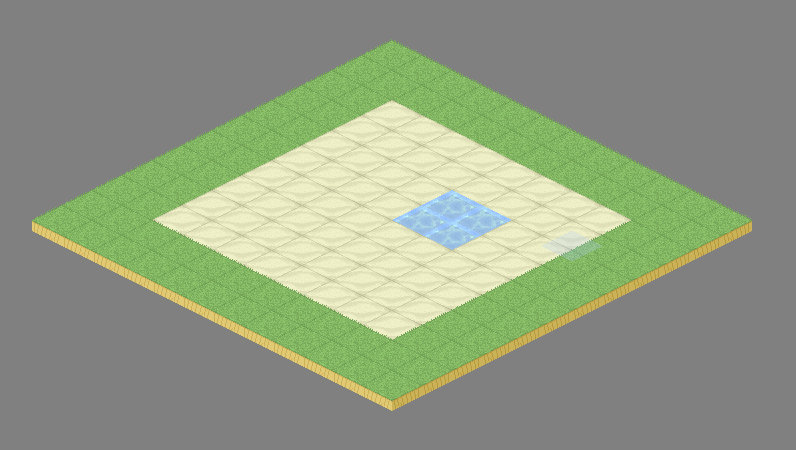
In part 1 of the tutorial I showed how to make an isometric map with Tiled Map Editor. In part 2, we’ll look at loading your map into a Corona project.

You’ll need to have your map exported as a .lua file from Tiled Map Editor. You’ll also need to use a module I’ve worked on called Isometric Tiled Map Editor which you can grab on Github: https://github.com/anthonygore/Isometric-Tiled-Map-Loader. To give credit where it’s due, most of that code was done by Caleb P here, I’ve just modified it to work with isometric maps.

I won’t explain how the module works here, just how to use it. You need to require the module as well as the exported map, load the map via the gridmap tool and insert it into a display group:

gridmap = require("gridmap")
mapData = require "map1" --assumes file is in root dir and named map1.lua
map = gridmap:createMap(mapData)
local group = display.newGroup()
group:insert(1, map)

Since an isometric map is displayed around the x-axis, you may need to offset the map so it’s centred on the screen. Here’s a simple function to do the job:

local function mapOffset(x, y)
    for i = 1, #mapData.layers do
        if mapData.layers[i].type == "tilelayer" then
            mapData.layers[i].x = mapData.layers[i].x - x
            mapData.layers[i].y = mapData.layers[i].y - y
        end
    end
    --Remove the map and redraw 
    map:removeSelf() 
    map = gridmap:createMap(mapData) 
    group:insert(1, map)
end
 
mapOffset(-5,5)

If you try the code or watch the video, you can see I’ve linked the right D-pad to the map offset function, meaning the user can move the map around during the game. In this game it’s a pretty useless feature, but I’ve left it in there as it may be useful for anyone expanding on the game.

In the next tutorial we’ll look at the game logic.


This tutorial assumes knowledge of:

  • Corona SDK
  • Tiled Map Editor

Here’s a short video of the game:

Corona isometric puzzle game

You can get the complete code here on Bitbucket: https://bitbucket.org/anthonygore/corona-isometric-map-template

In part 1 of the tutorial we’ll look at making an isometric map with Tiled Map Editor (a free tiled map tool http://www.mapeditor.org)

Firstly, create a new map. You’ll need to set the orientation to “Isometric” and the tile size to whatever you like, so long as the width is twice the height (shortly you’ll see why)

Tiled Map Editor - New Map

If you go to View > Show Grid, you’ll see the outline of your isometric grid:

Grid

Now, import your tiles by going Map > New Tileset… . Getting the width/height correct can be tricky, and the settings will be entirely dependent on your particular tileset.

Once you’ve drawn your map, you’ll have something like this:

Grid

Finally, export your map ready for import into Corona. Go to File > Export As… and choose the .lua file format.

In the next tutorial we’ll look at importing and displaying your isometric map in Corona.


Think of an isometric (aka 2.5D) map as a regular, top-down map (aka orthogonal map), only it’s tilted at a 45deg angle and slightly squashed to provide that fake-3D effect that makes many games look awesome.

In fact, each point on an orthogonal map has an equivalent point on an isometric map.

This insight is important because it demonstrates the key to working with isometric maps: you can deal with them the same way you deal with orthogonal maps, you’ll just have to have a “conversion” layer between your game logic and the drawing of the map.

Let’s say you have a particular tile (2,2) on a 5 x 5 grid:

{0,0,0,0,0}
{0,0,0,0,0}
{0,0,1,0,0}
{0,0,0,0,0}
{0,0,0,0,0}

This same grid can be represented orthogonally:

Or isometrically:

Assuming we have isometric map tiles drawn up, how do we position them on the isometric grid? Let’s compare the calculation of the top-left corner of the tile in both perspectives.

Orthogonal:

local tileWidth, tileHeight = 30, 30
local selectedTile = {gridX=2,gridY=2}
local topCorner = {}
topCorner.x = selectedTile.gridX * tileWidth
topCorner.y = selectedTile.gridY * tileHeight
print("Screen pos of top corner of tile (" .. selectedTile.gridX .. "," .. selectedTile.gridY .. ") is [" .. topCorner.x .. "," .. topCorner.y .. "]")

Output: Screen pos of top corner of tile (2,2) is [60,60]

Isometric:

local tileWidth, tileHeight = 60, 30
local selectedTile = {gridX=2,gridY=2}
local topCorner = {}
topCorner.x = (selectedTile.gridX - selectedTile.gridY) * tileWidth/2
topCorner.y = (selectedTile.gridX + selectedTile.gridY) * tileHeight/2
print("Screen pos of top corner of tile (" .. selectedTile.gridX .. "," .. selectedTile.gridY .. ") is [" .. topCorner.x .. "," .. topCorner.y .. "]")

Output: Screen pos of top corner of tile (2,2) is [0,60]

There’s a few things to notice:

  • The tile width and height are different in isometric. Commonly, though not necessarily, the width is double the height.
  • It might seem odd that tile (2,2) has an x co-ordinate of 0. In this style of isometric projection, the x-axis goes straight down the centre of the grid. That would mean tiles on the left side of the grid will have negative x values. You could add an offset to the map to adjust the map so there are no negative x values.

How is the conversion between ortho/iso points done?

You can read more about it here, but in summary, the formula is:

isoX = (orthX - orthY) * tileWidth/2
isoY = (orthX + orthY) * tileHeight/2

If you use Tiled Map Editor to create your maps, you can import them into Corona SDK with this tool.

Also, here’s a simple isometric puzzle game I’ve made in Corona and put on Bitbucket.


When you login to your Ubuntu server with SSH you may see a message like this:

Welcome to Ubuntu 12.04.4 LTS (GNU/Linux 3.11.0-23-generic x86_64)
 
* Documentation:  https://help.ubuntu.com/
 
Last login: Tue Jun 24 21:00:01 2014 from 123.123.123.123

It’s called the Message Of The Day (MOTD). It’s created by running, in numerical order, the scripts in /etc/update-motd.d. On my system I have:

00-header
10-help-text
90-updates-available
91-release-upgrade
98-fsck-at-reboot
98-reboot-required
99-footer

You can of course edit those scripts or add more. How can you disable the MOTD? Firstly ensure you have this in /etc/ssh/sshd_config:

PrintMotd no

If you’re using PAM, you may still see the message, despite turning it off in sshd_config. In which case edit /etc/pam.d/sshd:

#Print the message of the day upon successful login.
#session    optional    pam_motd.so

Be sure to comment out the second line.

In my case, I don’t want connecting users to see the dynamically created MOTD, I just want a plain, old banner with a legal notice, something like this:

WARNING<strong> :</strong> Unauthorized access to this system is forbidden and will be
prosecuted by law. By accessing this system, you agree that your actions
may be monitored if unauthorized usage is suspected.

For the more creative, why not use a cool ASCII text banner?

When you’ve made your banner, save it to /etc/ssh/sshd-banner (you can specify a different directory if you like), and edit /etc/ssh/sshd_config again and add this line:

Banner /etc/ssh/sshd-banner

Be sure to then restart SSHD:

$ sudo service ssh restart

Let’s say you have a 2D grid with distinct, arbitrary shapes on it (polygons of any sort), and you’d like to isolate the distinct shapes. For example, this 2D grid could represent a game’s map with a system of different shaped buildings. If your player is on top of one building, the game logic requires the application to distinguish the isolated shapes for pathfinding purposes etc.

E.g.:

{0,0,0,0,0,0}
{0,1,1,0,0,0}
{0,1,1,0,0,1}
{1,1,0,1,0,1}
{0,0,0,1,0,1}
{0,0,1,1,1,1}

You can see two distinct shapes on this grid, one on the top left, the other in the bottom right (we ignore touching diagonals).

To isolate the shapes, iterate the grid left-to-right, top-to-bottom. For each cell (xi, yi) that has a value vi where i > 0, check the cell directly above i.e. (xi, yi-1), and directly behind i.e. (xi-1, yi), where i-1 > 0. If either of these has a value vi where i > 0, assign (xi, yi) the value vi. If they don’t, this cell must be part of a new shape. Assign (xi, yi) the value vi+1.

The output will be:

{0,0,0,0,0,0}
{0,1,1,0,0,0}
{0,1,1,0,0,2}
{1,1,0,2,0,2}
{0,0,0,2,0,2}
{0,0,2,2,2,2}

As mentioned, this algorithm ignores touching diagonals. In the example, if we considered (xi, yi) and (x4, y4) to be touching, then there’d just be a single shape on this grid.

Here’s an implementation in Lua:

-- og is "old gird"
-- ng is "new grid"
local function createPolyObjects (og)
    local objNum = 0
    local ng = {}
    for y = 1, #og, 1 do
        ng[y] = {}
        for x = 1, #og[y], 1 do
            local tile = {}
            tile.val = og[y][x];
            tile.x = x
            tile.y = y
            if tile.val == 1 then
                --Tile above
                local tileAbove = {}
                tileAbove.x = x
                tileAbove.y = y-1
                if tileAbove.y > 0 then
                    tileAbove.val = ng[tileAbove.y][tileAbove.x]
                else
                    tileAbove = nil
                end
 
                --Tile behind
                local tileBehind = {}
                tileBehind.x = x-1
                tileBehind.y = y
                if tileBehind.x > 0 then
                    tileBehind.val = ng[tileBehind.y][tileBehind.x]
                else
                    tileBehind = nil
                end
 
                --Determine the correct objNum to assign
                if tileAbove == nil or tileAbove.val == 0 then
                    if tileBehind == nil or tileBehind.val == 0 then
                        objNum = objNum + 1
                    end
                else
                    if tileBehind.val > tileAbove.val then
                        ng = obj.changeObjNums(ng, x, y, objNum, tileAbove.val)
                        objNum = tileAbove.val
                    else
                        objNum = tileAbove.val
                    end
                end
 
                --Populate ng
                ng[y][x] = objNum
            else
                ng[y][x] = 0
            end
        end
    end
    obj.max = objNum
    return ng
end
 
--Helper function:
--Changes the "object number" used on the grid
local function changeObjNums (grid, x, y, oldNum, newNum)
    for j = y, 1, -1 do
        for i = x, 1, -1 do
            if grid[j][i] == oldNum then
                grid[j][i] = newNum
            end
        end
    end
    return grid
end

This code is part of my Lua Grid Tools repo on Bitbucket.

Next I’ll explain how to break up the polygons into distinct rectangles. This is useful if you’re aiming to add each shape to Box2D, as convex shapes cannot be used in Box2D. Check that out here.